From manual to automatic control with SharpView
Francisco Feijoo - Monday, Mar 25, 2019
SharpView is a security platform designed to bring you all the flexibility required when customizing the system to your real needs.
In any decent security installation you will have a number of sensors, that will trigger different reactions from the system. An extremely common example is to have Passive Infra-Red detectors (PIR) covering different areas of your site and one or multiple Pan-Tilt-Zoom (PTZ) cameras that move to those areas when the PIR(s) are activated.
So, how do we get this working together?
The traditional way
Most systems - in one way or another - allow you to configure certain rules to get this setup working, normally by associating Digital Input (DI) alarms to predefined camera positions (presets).
In Sharpview this can be done following these basic steps:
1. Configure camera presets
Using the device controller you can add or modify presets that are stored in the camera.
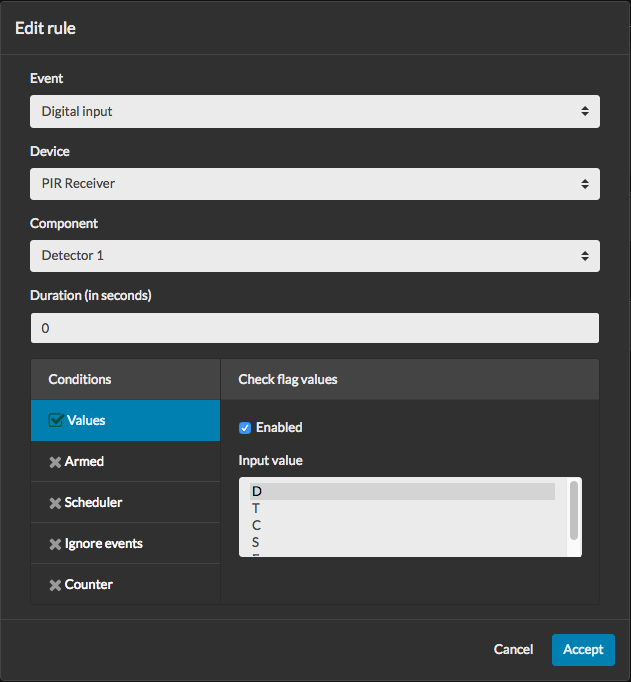
2. Configure a rule
Add a trigger to the rule engine to move the camera when some input is received
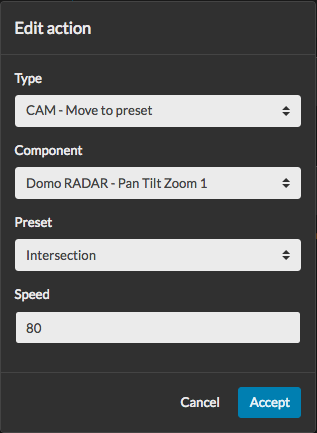
3. Configure actions
Add one or multiple actions to move your camera to a preset (or do whatever you need)
This is what is normally available on a traditional VMS/NVR, but SharpView is not just “normal” or “traditional”, so keep reading to see how security is going to be dealt with in the future (or today if you use SharpView!).
Put your system on AutoPilot
One of the main features of SharpView is that every device can be easily geo-referenced (located on a map). This is the key to be able to do lots of new features.
So let’s have a look at how it works:
1. Locate your devices
To locate a device on a map go to the device page and configure it’s location. You can put your cameras and also PIR, DI, radars (and everything else) on the map
2. Generate tracks from your devices
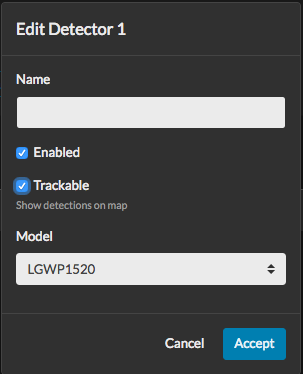
When the system receives an activation (eg. a PIR detects movement), a track is automatically generated and is displayed on our map viewer.
This can be disabled by editing the sensor and changing the Trackable setting.
3. Automatic camera control
When there is an active track, the system will record what’s happening by sending one or multiple cameras available to see that track.
The system is clever enough to:
- Select the camera with best view
- Discard any camera that is being used by other user (with enough rights)
- Avoid using cameras that don’t have line of sight to the track
- When the track is gone (configurable), the camera will be sent back to it’s HOME position
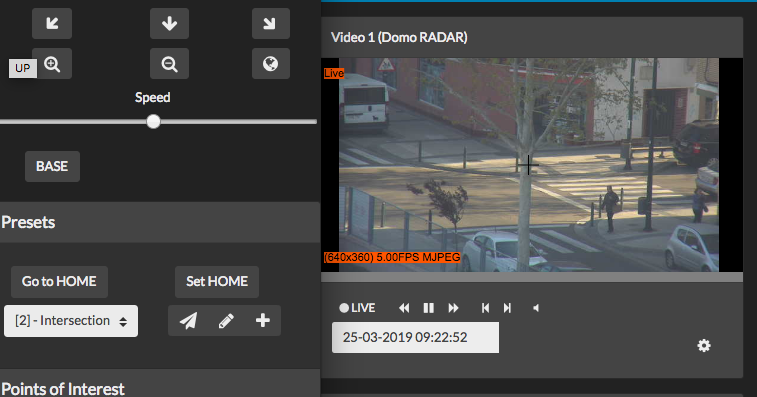
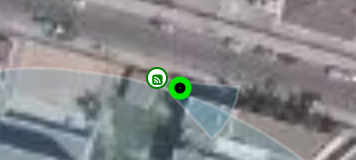
Here is an example of a camera changing from the HOME position to look at a track generated by a PIR, once the camera is looking at it the operator takes control using Point and Shoot :
If you only want some cameras to be available for auto-tracking, you can enable or disable this feature in the camera edit page changing the setting Use camera to track targets
Detection zones
A common question we get is:
– Okay, this looks great but, if the system is controlling the cameras automatically, how could I prevent a camera from looking to the wrong place? How can I protect an area of higher interest? –
Don’t worry - we have you covered - let’s talk briefly about detection zones.
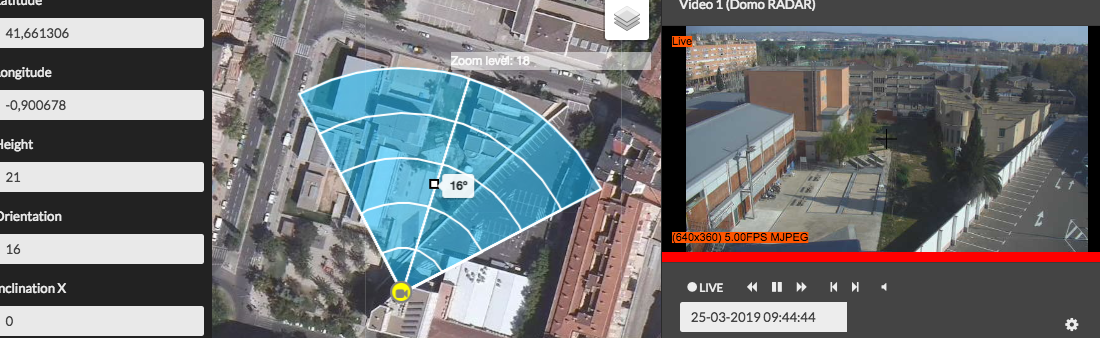
When you are configuring your site security, you can add areas of different types:
- Detection Areas: You can have different areas with different priorities.
- Exclusion Areas: Nothing that happens inside this area will be tracked by your cameras. A common example is a motorway or a public road close to your site where you may be getting detections but are completely irrelevant.
- Virtual Walls: To prevent cameras to look in the wrong direction, you can draw walls. If there is a wall between a camera and a track, that camera doesn’t have line of sight so it won’t be used.
In future posts, we will go deeper on this topic.
Advantages of automatic security
Some of the benefits of using the automatic mode are:
- No need to configure and memorize presets on the camera.
- No need to configure (and maintain) hundreds of rules associating cameras and sensors, which in some cases are contradictory.
- Better management of resources. What happens when two sensors associated to the same camera activate at the same time? If using the automatic control two tracks will be generated and either:
- A different camera will be sent to look at each detector, or
- If you only have one camera available it will be swapping at intervals to look at both detections
- When a camera fails, if you are using the traditional mode all the detections associated to that camera will fail. With the automatic mode you don’t need to worry about that, because if there are other cameras that can view that area, they will be used.
- When a camera has to be replaced, you won’t need to re-configure the presets and rules, it will just keep working the same way.
- Combined with Video Analysis you get an advanced tracking system (contact us for more details)
- Tracks, camera position, and camera Field of View (FOV) is shown in real time to the security operators improving response times.
- The system generates more data, allowing future features like heat mapping for your entire site.
Conclusions
While some may prefer to have full control of when a camera moves, SharpView offers a new way to manage security which adds a good number of key features.
Once you have setup your system, it will be able to optimize your resources (cameras) and get the best evidence of what happened when a sensor was activated.